A sewing pattern is a map, and sewing pattern markings are its legend. They tell you where to cut, where to stitch, how to lay the piece on the fabric and which edge joins which. On a pattern for 11.5 inch fashion dolls such as Barbie® every piece is about the size of a postage stamp, so a mark you could ignore on a full size dress becomes a visible mistake on a doll dress. This guide goes through the markings on our own doll clothes patterns first, line by line, and then the symbols you meet on big commercial patterns, so nothing on a sheet stays a mystery.
Cut line and seam line: the two lines that matter most
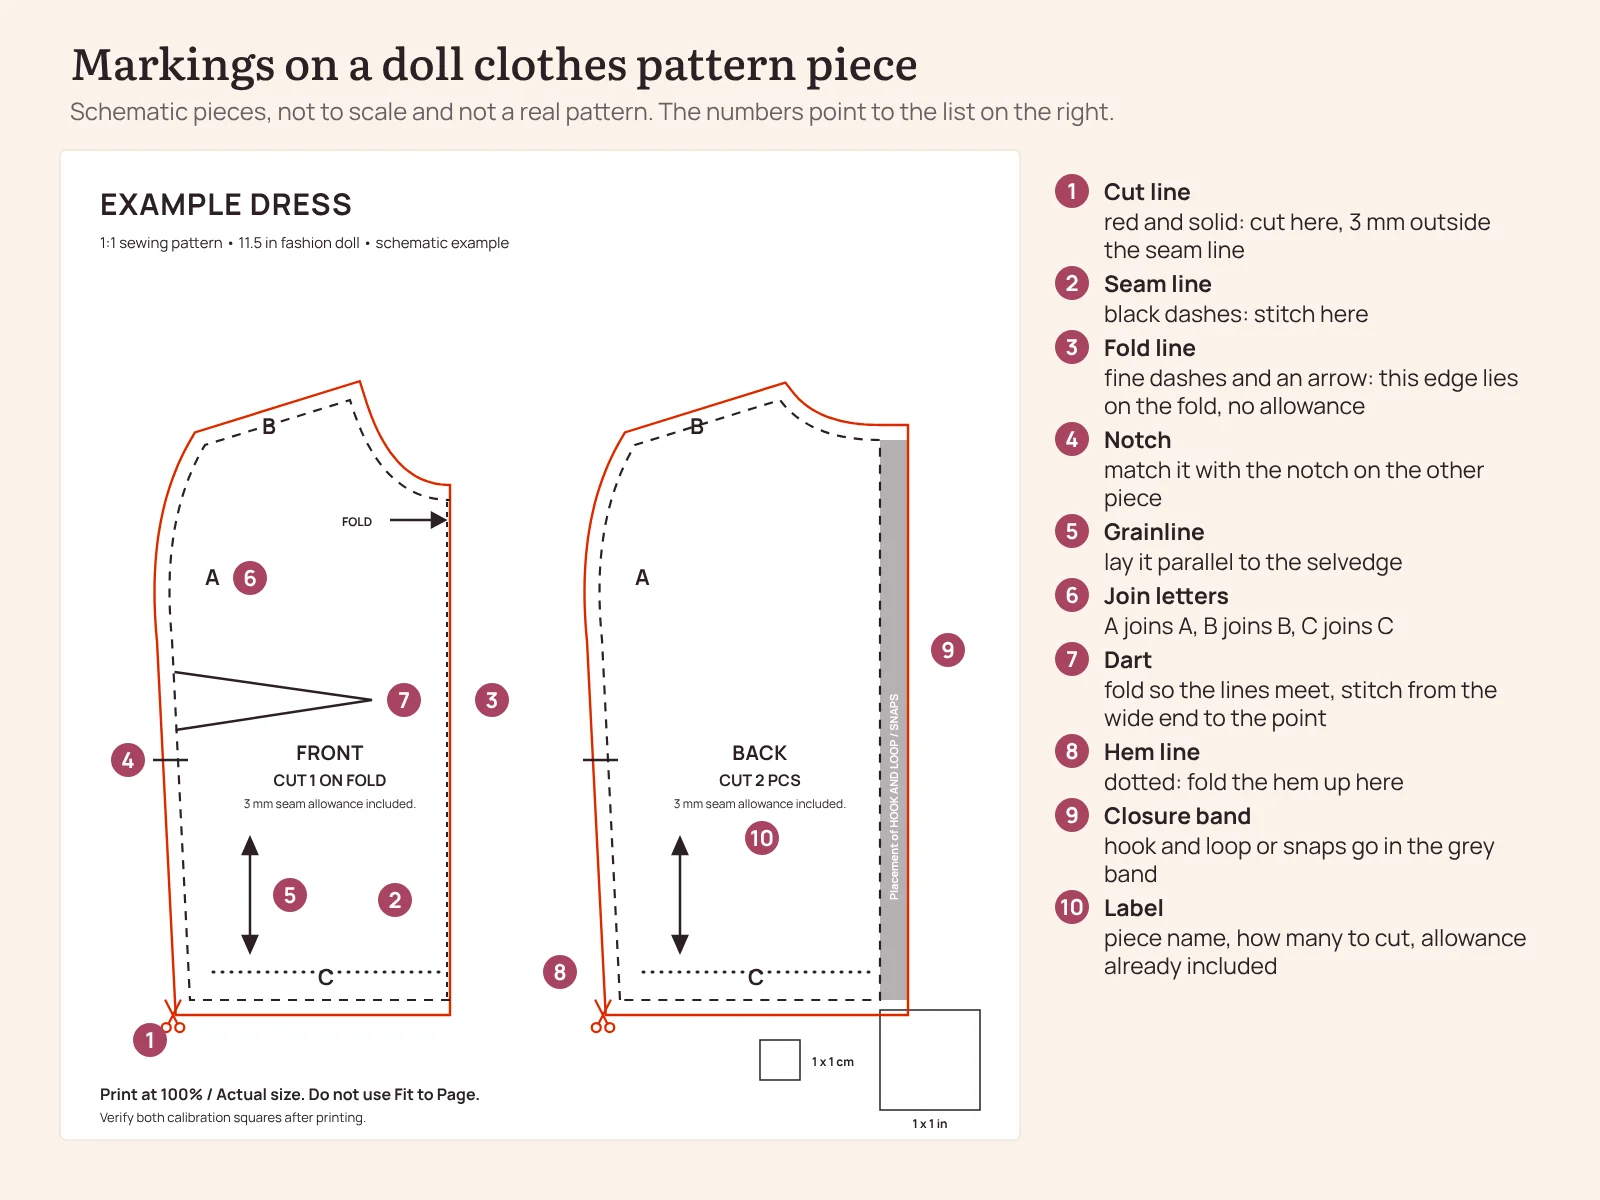
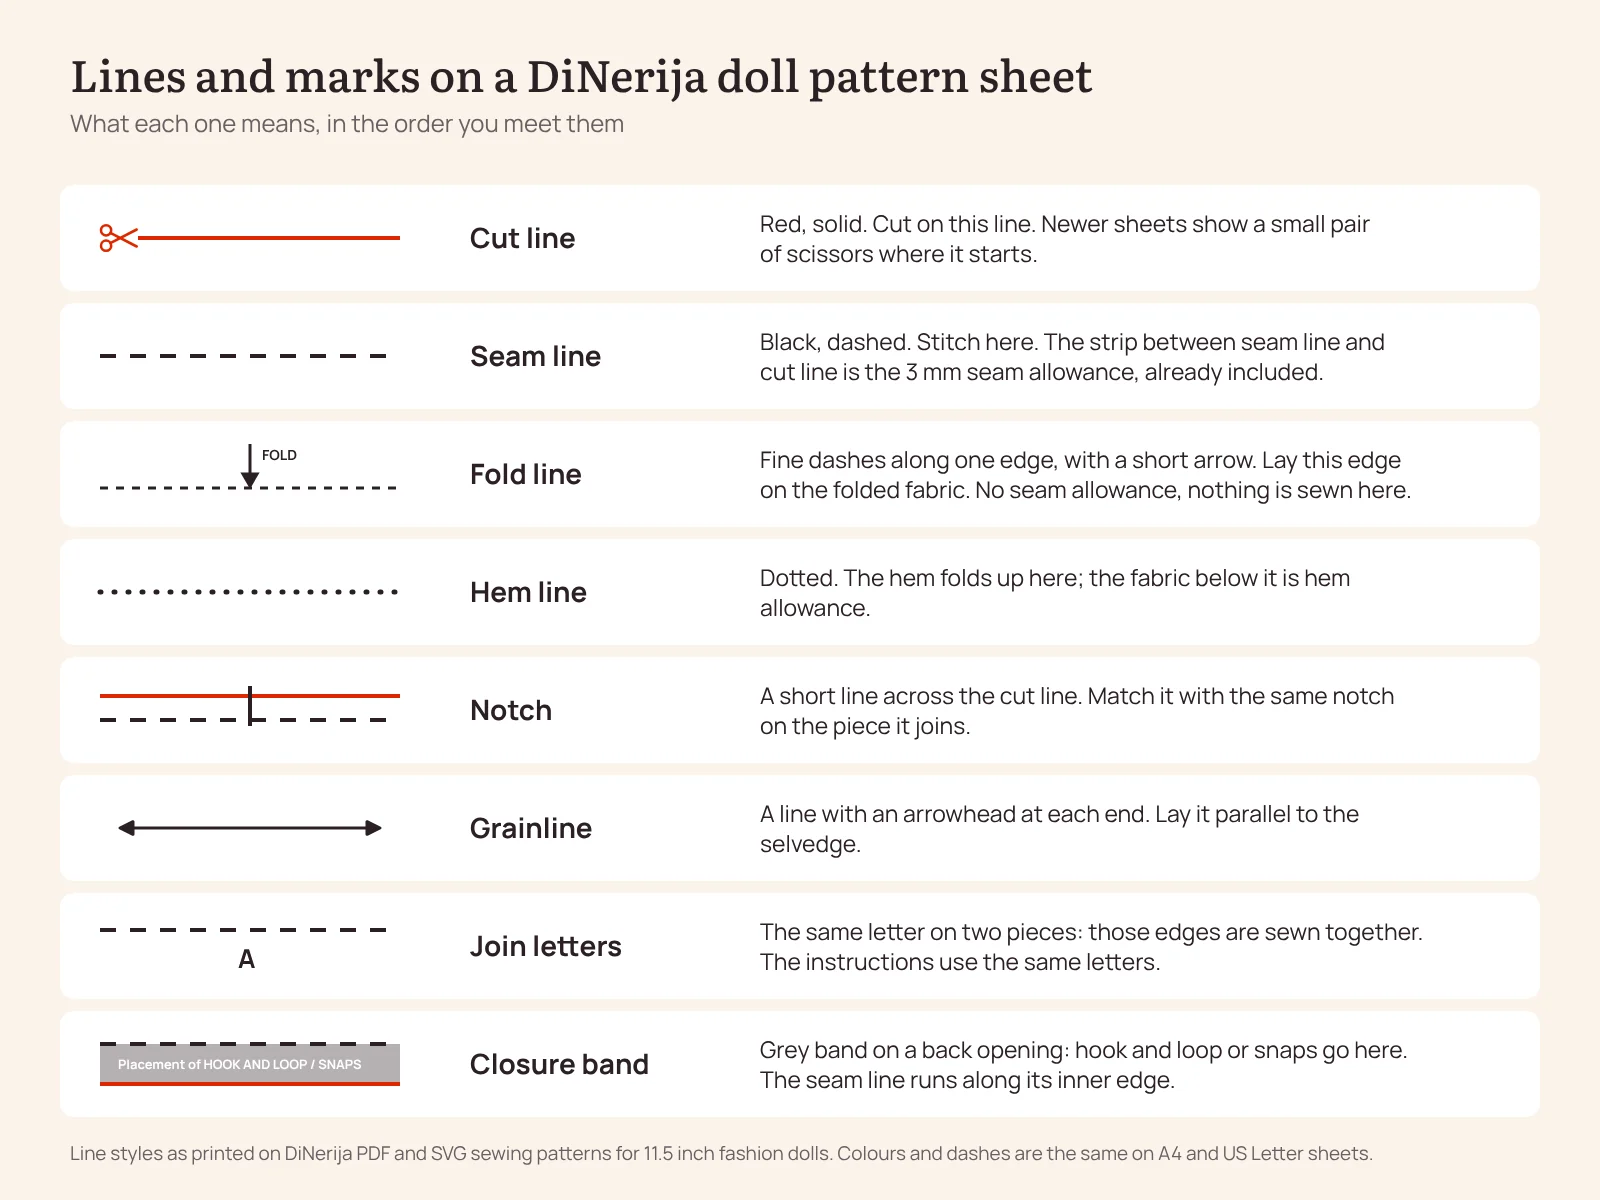
On our sheets the outer red solid line is the cut line. Newer sheets print a small pair of scissors where the line starts. You cut on it, not inside and not outside. The black dashed line just inside is the seam line, also called the stitching line, and this is where the needle goes.
The narrow strip between the two lines is the seam allowance. On our patterns it is 3 mm on current sheets and 3 to 4 mm on a few older ones, about 1/8 inch, and it is already included; the note under each piece name says so. Do not add anything. A 1.5 cm allowance, the usual width on a full size pattern, would be wider than a doll's shoulder strap.
If you have ever wondered what the dotted lines on a sewing pattern mean, the short answer is: dashed means stitch, solid means cut. Fold lines and hem lines use finer dashes and dots, and we cover both below.
Fold line: cut 1 on fold
Some pieces are drawn as one half. The edge with the fine dashed line and a short arrow pointing at it is the fold line, and the label reads CUT 1 ON FOLD. Fold the fabric, lay that edge exactly on the fold, pin, and cut around the other edges. Open the fabric and you have one symmetrical piece, with the neckline the same on both sides.
There is no seam allowance on a fold edge and you never cut along it. The seam line on such a piece stops at the fold, because nothing is sewn there.
Hem line
A dotted line along the bottom of a piece is the hem line: the fabric folds up here, and everything below it is hem allowance. How deep to fold is in the sewing instructions for that pattern. On a woven doll dress the hem is usually folded twice; on a knit that does not fray, the hem can stay unfolded, because extra stitching looks bulky at this size.
Notches
Of all sewing pattern markings, notches are the ones beginners skip most, and the ones that save the most unpicking. A notch is a short line crossing the cut line at a right angle, 4 mm long on our sheets. Notches come in pairs, one on each of the two pieces that will be sewn together, so you can match them before pinning. On a sleeve a notch shows where the sleeve cap meets the shoulder seam; on a side seam it shows where a slit begins.
On a big pattern you would snip into the allowance to mark a notch. With a 3 mm allowance a snip is risky, so mark the notch on the wrong side of the fabric with a soft pencil or a vanishing marker instead. If you prefer to snip, keep it well under 2 mm.
Grainline arrow
The grainline is a straight line with an arrowhead at each end. Lay the piece so that this line runs parallel to the selvedge, the finished edge of the fabric. Fabric stretches least along the grain and most across it, so the grainline decides how a skirt hangs and in which direction a top stretches. We draw it where the direction matters; on felt or another non-woven you can ignore it. For stretch fabrics the instructions also say which way the greatest stretch should run, usually around the body.
Join letters: A, B, C
This is the marking people ask about most. The letters printed next to an edge are join letters. The same letter appears on the edge of the piece it is sewn to: edge A on the front goes to edge A on the back, edge C to edge C. Our instructions use the same letters, so a step such as "stitch the side seam at line B" points to one exact edge and nothing else. If one letter has to serve two edges, they are numbered B1 and B2.
The grey band: where the closure goes
Garments that close at the back have a grey band along the back opening with the text Placement of HOOK AND LOOP / SNAPS. The band is the allowance on that edge, a little wider than the 3 mm elsewhere, and the seam line runs along its inner edge. Sew your hook and loop tape or snaps inside the band and the opening will close exactly on the seam line.
Darts, labels and how many to cut
A dart is two solid lines meeting at a point inside a piece. Fold the fabric so the two lines lie on top of each other and stitch from the wide end to the point. Our ten tips for clean seams at 1:6 scale explain why you should not backstitch at the tip.
The label block in the middle of each piece gives the piece name, the quantity and the allowance note. CUT 2 PCS means two pieces as a mirrored pair, so cut them from doubled fabric or flip the paper for the second one. CUT 1 means one piece; CUT 1 ON FOLD, one piece on the fold. Short words near an edge, such as TOP, HEM or FOLD, tell you which way is up.
The print check: line key and calibration squares
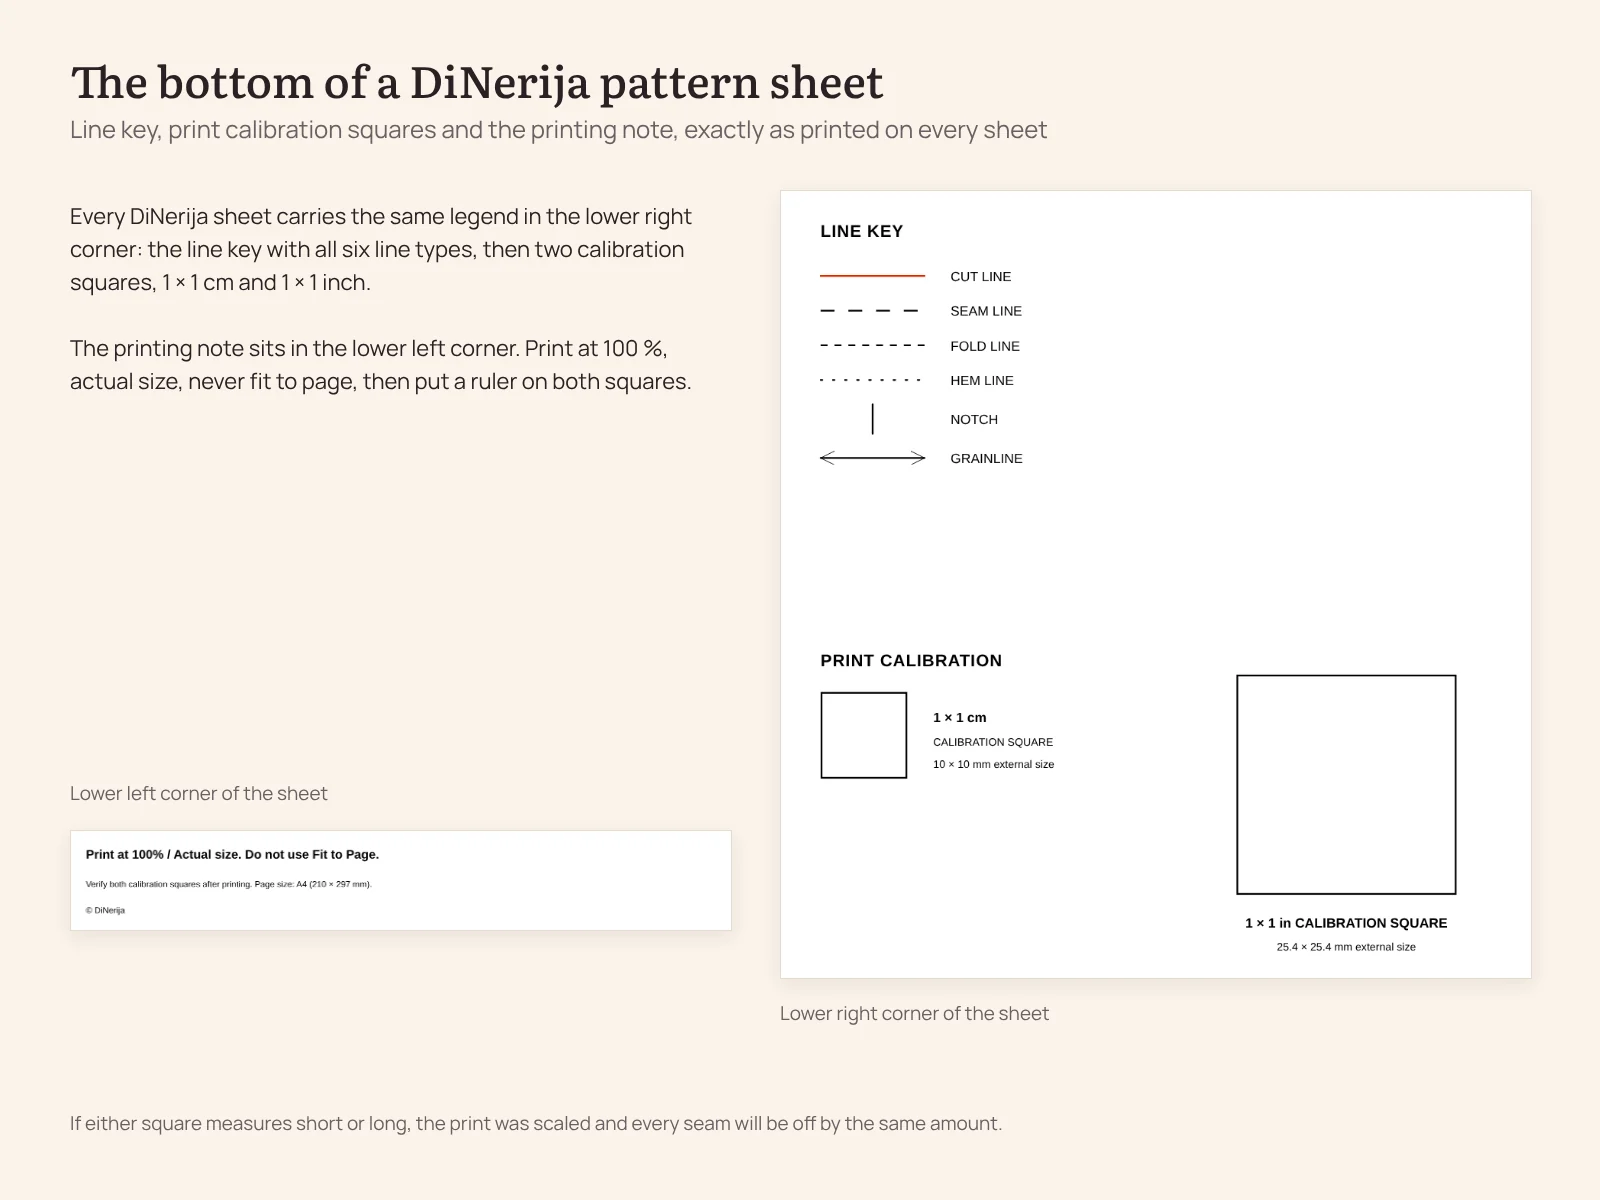
Every sheet carries a line key, the legend with each line type, and a print calibration block with a 1 × 1 cm square and a 1 × 1 inch square. Older sheets have a 1 cm and a 1 inch line instead. Print at 100 %, actual size, never fit to page, then measure both squares with a ruler. If a square is off by a millimetre, so is every seam. The full printing routine is in our post on how to print a PDF doll sewing pattern at the right size.
Sewing pattern markings on big commercial patterns
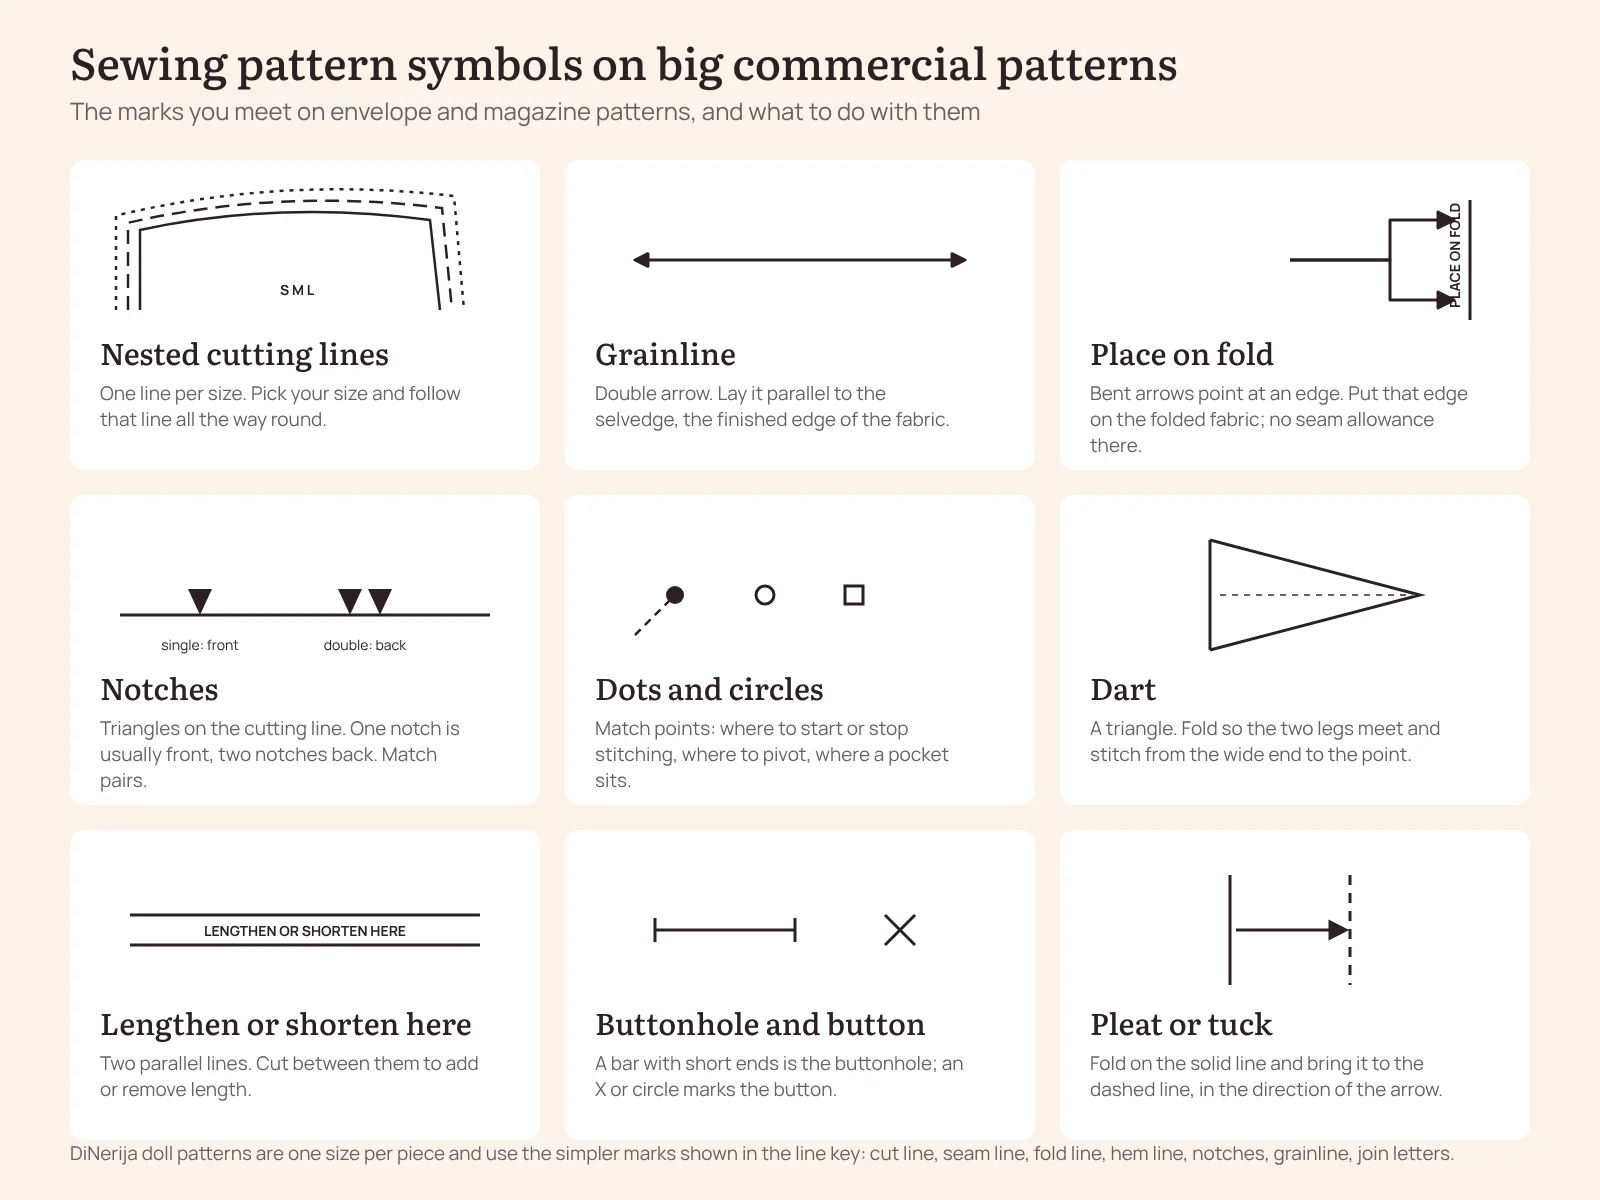
Envelope and magazine patterns are drawn for several sizes on one sheet, so they need symbols a one size doll pattern does not. The cutting lines are nested, one dash style per size, and you follow your line all the way round. Notches are triangles on the cutting line: one notch usually marks the front, two notches the back. Dots, circles and squares are match points: where to start or stop stitching, where to pivot at a corner, where a pocket sits. Two parallel lines labelled lengthen or shorten show where to cut the paper to change the length. A bar with short ends is a buttonhole and an X or a circle is the button. Pleat lines come with an arrow that shows which way to fold. And a bracket of bent arrows pointing at an edge means place on fold. The full theory, company by company, is in our guide to sewing pattern symbols on commercial patterns.
Two things are easy to get wrong when you move from big patterns to doll patterns. First, many big patterns print only the cutting line and state the allowance in the instructions, usually 1.5 cm or 5/8 inch; some European pattern magazines include no allowance at all and ask you to add it. Second, a big pattern piece can be labelled cut 2, cut 1 lining and cut 1 interfacing at the same time. On our sheets the seam line is always drawn, the allowance is always included, and one piece is one size. The general history of these conventions is on the Wikipedia page on sewing patterns.
Getting the markings onto the fabric
Sewing pattern markings only help once they are on the fabric. Transfer every mark before you unpin the paper, on the wrong side of the fabric. A soft pencil or a vanishing fabric marker makes a fine enough line; tailor's chalk is too wide for a piece this small. For a dart point or a match point, push a pin through the paper and dot the pin hole. Mark the notches, the fold line if the piece is cut flat, the dart legs and the top of the closure band. Once the paper comes off, a 3 mm allowance gives you nothing to measure from, so the marks are all you have.
Questions we get
What does the red line on the pattern mean?
The red solid line is the cut line. The black dashed line inside it is the seam line. The 3 mm between them is the seam allowance, already included.
Do I add seam allowance to a doll sewing pattern?
Not to ours. Every piece says "3 mm seam allowance included". Adding the usual 1 cm at each side seam would put 2 cm on a waist that is only a few centimetres round.
Do I have to cut the notches?
No. On a doll pattern it is safer to mark them with a pencil on the wrong side. A snip deeper than 2 mm would reach the seam line.
Are the same markings in the SVG files?
Yes. The SVG version of each pattern has the same red cut lines, dashed seam lines and labels, each on its own layer. Our post on cutting doll clothes patterns with Cricut® or Silhouette® explains what to do with the layers before you upload a file.
Practise on a free pattern
If you want to practise reading a sheet before you sew anything, the free no-sew doll dress pattern uses the same red cut line and fold line and has no seams at all. The maternity dress pattern is a good first sewn project: two pieces, join letters A, B and C and one notch. All our PDF and SVG patterns are in the Sewing Patterns category, and the Size Guide tells you which body type your doll is before you cut.